

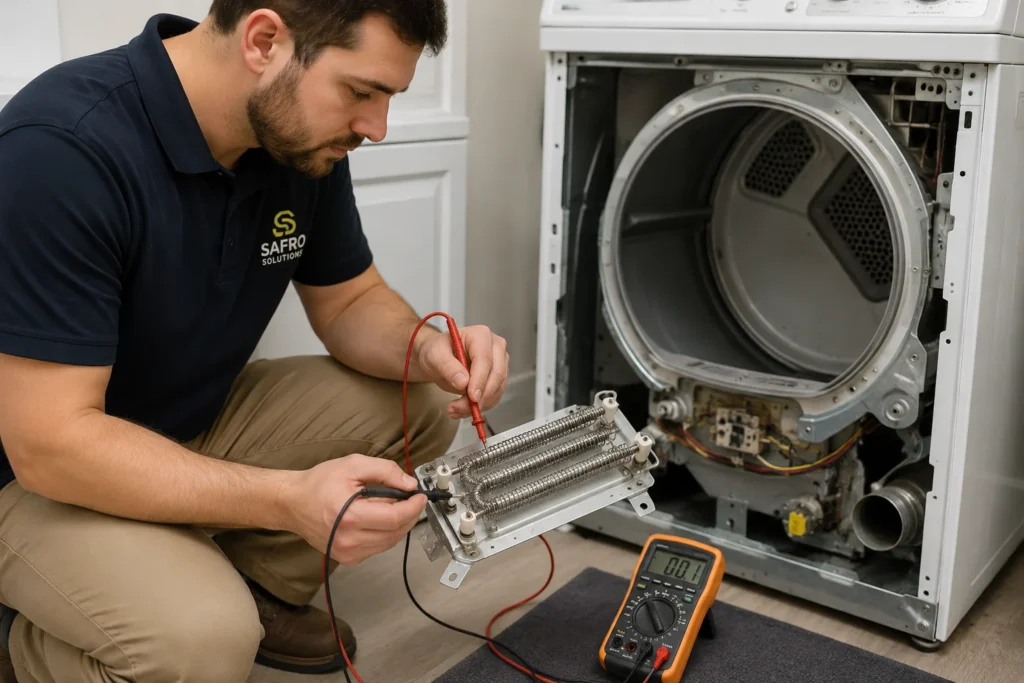
A burned-out dryer heating element almost always shows the same pattern: the drum still tumbles, the timer still counts down, but the clothes come out cold and damp no matter how long the cycle runs. That symptom alone isn’t proof, though. The only way to confirm it is a multimeter continuity test across the element’s terminals, which takes about ten minutes once the dryer is unplugged and the back panel is off.
Key takeaways
- A dryer that runs, tumbles, and times out normally but never produces heat is the classic burned-out element pattern, though a clogged vent and a blown thermal fuse can look identical.
- A healthy element reads roughly 10 to 50 ohms on a multimeter, depending on wattage. An “OL” or infinite reading means it’s open and failed.
- No multimeter on hand? You can still rule the element in or out with a visual inspection and one safe power test, covered below.
- In the Safro Solutions service area, dryer repairs typically run $100 to $400 depending on the part, and heating element work tends to fall on the higher end of that range.
- If you’ve already checked the vent and the element still tests bad, that’s when it’s time to stop testing and call a licensed technician.
In this article
- Is it really the heating element? 3 quick signs before you open anything up
- What actually causes a heating element to burn out
- How to test a dryer heating element with a multimeter
- No multimeter? 3 things you can still check safely
- Electric vs. gas dryer: what’s different about testing
- Don’t confuse this with a clogged vent
- What it costs to fix in Los Angeles
- When to stop testing and call a professional
- Frequently asked questions
Is it really the heating element? 3 quick signs before you open anything up
Three signs point toward the heating element before you ever pick up a tool. First, the dryer runs a full cycle, the drum turns, and the timer moves normally, but the load stays cool or barely warm the entire time. Second, you can smell a faint burning odor near the back of the dryer during operation, which often means the coil has arced or partially shorted. Third, if you pull the back panel and can see the coil itself, a burned-out element usually shows a visible break, a warped section, or a scorched, discolored patch along the wire.
None of these three signs confirm the element on their own. A dryer that “runs but tumbles but no heat” produces the exact same symptom whether the cause is the element, a blown thermal fuse, or a bad cycling thermostat. That’s why the multimeter test below is the step that actually settles it, not the visual checklist.
What actually causes a heating element to burn out
Most heating elements fail for one of three reasons: restricted airflow, ordinary age, or a power supply problem. Restricted airflow is the most common cause by far. When a vent or lint trap blocks exhaust air from escaping, heat has nowhere to go, and the coil runs hotter than it’s rated for on every single cycle until it eventually breaks. Ordinary wear is the second cause. A heating element is a coil of resistance wire, and after roughly a decade of regular use it can simply fatigue and snap, the same way any wire eventually does under repeated heating and cooling cycles. The third cause is less common but worth ruling out: a voltage problem, such as a loose connection at the terminal block or power running consistently above the dryer’s rated voltage, which stresses the coil every time the element cycles on.
Because airflow restriction is the leading cause, checking the vent path is a normal and often necessary step before you even get to testing the element itself, and it’s covered in its own section further down.
How to test a dryer heating element with a multimeter
You confirm a dead heating element with a continuity or resistance test, and a healthy element typically reads between 10 and 50 ohms depending on its wattage. This lines up with EngineerFix’s multimeter testing guide for dryer heating elements, which notes that a common 5,400-watt, 240-volt element should measure close to 10.6 ohms when healthy. Here’s the process, in order.
- Unplug the dryer. For electric dryers this means pulling the plug or shutting off the breaker, since the element runs on 240 volts. Never test with the dryer connected to power.
- Remove the back access panel. On most electric dryers, the heating element assembly sits behind the rear panel, held in place by a few screws.
- Disconnect the two wires from the element’s terminals so you’re testing the element in isolation, not the rest of the circuit.
- Set your multimeter to the ohms (Ω) or continuity setting, using the lowest resistance range available.
- Touch one probe to each terminal on the heating element.
- Read the result.
Multimeter reading | What it means |
| Roughly 10–50 ohms (a common 5,400-watt, 240-volt element measures close to 10.6 ohms) | Element has continuity and is likely functioning |
“OL” or an infinite reading, or no continuity tone | The coil has an open break. The element has failed. |
| Any measurable resistance or a tone between a terminal and the metal housing | The element is shorted to the chassis. This is a hazardous condition. Replace it, don’t reuse it. |
That third row matters as much as the first two. A shorted element can energize the dryer’s metal cabinet, so if you get continuity between a terminal and the housing, stop and treat it as an electrical safety issue, not just a part to swap.
No multimeter? 3 things you can still check safely
Without a multimeter, you can still narrow down a bad element using three checks that don’t require any special tools. First, pull the back panel and visually inspect the coil for an obvious break, a section that looks warped or sagging, or scorch marks, any of which point to a failed element even without a resistance reading. Second, listen and watch during a short heat cycle: a working element will glow a dull orange faintly visible through the housing gap on many models within the first minute or two of a heat cycle, while a dead one stays completely dark and cool to the touch near the housing. Third, do a power-cycle test by turning the dryer off, waiting a minute, and running a fresh cycle. This won’t fix a burned-out element, but it rules out a one-time control glitch versus a genuinely dead component if the no-heat symptom returns immediately and consistently.
These three checks are a reasonable stand-in when a multimeter isn’t available, but they’re not as conclusive as the resistance test. If the visual and glow checks come back ambiguous, that’s a sign to either borrow a multimeter, which costs under $20 at most hardware stores, or move straight to a professional diagnosis.
Electric vs. gas dryer: what’s different about testing
The multimeter test above applies to electric dryers, which heat using a resistance coil. Gas dryers don’t have a heating element at all. Instead, they use a gas valve with an igniter or glow bar that lights the burner directly, so a gas dryer that runs but won’t heat is more likely dealing with a failed igniter, a faulty gas valve solenoid, or a gas supply issue than anything resembling the coil test above. If you have a gas dryer and it’s not heating, the igniter and valve coils are the components worth testing first, and that’s a different diagnostic path than the one in this guide.
Both electric and gas dryers share one component that can produce the exact same “runs but no heat” symptom regardless of fuel type: the thermal fuse, which is the subject of the next section.
Don’t confuse this with a clogged vent
A clogged dryer vent can produce the exact same “no heat” symptom as a burned-out element, and it’s the single most common thing homeowners misdiagnose. When a vent is blocked, the dryer overheats internally, which trips the thermal fuse, a one-time safety device that permanently cuts power to the heating circuit once it blows. At that point the dryer keeps running and tumbling exactly like it does with a dead element, but the actual failure is the fuse, not the coil.
We cover the full mechanism, the warning signs of a blocked vent, and the step-by-step way to clear one in our guide on how a clogged dryer vent makes your dryer stop drying properly. The short version that matters here: if you replace the heating element without checking the vent first, and the vent turns out to be the real problem, the new element or the freshly replaced fuse can fail again for the same reason. Check the vent
before you replace parts, not after.
What it costs to fix in Los Angeles
Heating element repairs in the Safro Solutions service area generally cost less than most homeowners expect, and national data backs that up. According to Angi’s cost data on dryer heating element replacement, the repair averages $230, with a typical range of $100 to $350 depending on the dryer’s age, brand, and whether it’s gas or electric. That national range lines up closely with what we see across Los Angeles and the San Fernando Valley.
Item | Typical cost |
| Diagnostic / service call fee | 69–129 (waived when you proceed with the repair) |
Simple fixes (thermal fuse, single-component swaps) | Lower end of the range |
| Heating element or drum-related repairs | Higher end of the range |
General dryer repair range, all causes | 100–400 |
Heating element work tends to land on the higher end of that general dryer repair range rather than the lower end, since it usually involves removing the back panel and testing the surrounding circuit, not just swapping a single inline fuse. If you want the full breakdown for other common dryer failures in the area, our dryer repair Los Angeles page has the complete pricing picture, including thermal fuse and control board costs.
When to stop testing and call a professional
If you’d rather have a licensed technician handle the whole diagnosis, Safro Solutions tests the element, the vent, and the fuse together instead of guessing at one part in isolation. Stop troubleshooting and call a technician the moment you’re dealing with anything beyond a straightforward part swap: a shorted element that showed continuity to the chassis, any burning smell that persists after the dryer is off, visible arcing, or a dryer that keeps blowing a new thermal fuse even after the vent is clear. Dryer heating elements run on 240 volts, and a shorted one can put voltage on the metal cabinet, which isn’t a risk worth taking to save a service call.
It’s also worth calling in a professional if you’ve done the multimeter test, confirmed the element is dead, but you’re not comfortable pulling the drum or accessing the element on a front-load or stacked unit, since some models require more disassembly than others to reach the part safely.
Ready to find out for sure?
If you’ve run the multimeter test, checked the vent, and you’re still getting a “no heat” dryer or a shorted element reading, don’t keep guessing at parts. A shorted or repeatedly failing element is often a sign of an underlying airflow or wiring issue that a new part alone won’t fix. Safro Solutions sends a licensed technician to your door, tests the actual cause instead of swapping parts on a guess, and gives you a straight answer on the repair before any work begins.
Safro Solutions
Valley Village, Los Angeles, CA 91607
Call or text: (747) 250-6879
Find us on Google Maps: https://maps.app.goo.gl/Tdof4dD9BS5Tk1i2A
Schedule your dryer repair online, or if you haven’t ruled out the vent yet, start with our guide on how a clogged dryer vent makes your dryer stop drying properly to check that first.
Frequently asked questions
Q1: What is the average lifespan of a dryer heating element?
Most heating elements last around 10 years under normal use before ordinary wear causes the coil to fatigue and break. A dryer needing its first element replacement well before that age often points to an airflow problem accelerating the wear rather than a defective part.
Q2: Is it worth replacing a heating element on a dryer, or should I replace the whole machine?
In almost every case, yes, it’s worth repairing. A heating element replacement typically costs a few hundred dollars at most, while a new dryer runs $500 to $1,500 before delivery and installation, so the repair only stops making sense if the dryer already has multiple other components failing at once.
Q3: Why does my dryer heating element keep failing repeatedly, even after I replace it?
A heating element that fails again and again almost always points to a recurring airflow restriction rather than a defective part, since sustained overheating from a blocked vent will burn out a brand-new element just as easily as it burned out the old one. If you’ve replaced the element more than once, the vent and duct path need a full inspection before you install a third one.
Q4: What are the symptoms of a bad thermal fuse on a dryer, as opposed to a bad heating element?
A blown thermal fuse and a dead heating element produce the identical symptom from the outside: the dryer runs and tumbles but never heats. The difference only shows up when you test each part individually with a multimeter, since a blown fuse reads no continuity across its own two terminals while the heating element itself may still test fine.
Q5: Can a dryer heating element work intermittently, cycling between hot and cold instead of failing completely?
Yes. A partially cracked coil or a failing cycling thermostat can cause heat to come and go instead of stopping entirely, which is a different pattern from the complete “runs but never heats” symptom this guide focuses on and can point to the thermostat rather than the element itself.